WinToFlash NOVICORP
PROFESSIONAL FULL VERSION SETUP FREE- 100% WORKING.
Hi Guys, Welcome to YOUR 1 COMPLETE SOLUTIONS.
In this blog , I am going to tell how you can get -
WinToFlash NOVICORP PROFESSIONAL FULL VERSION SETUP FREE that works 100%.
1. Open the browser, Copy these links:- http://s000.tinyupload.com/index.php?file_id=38624377304577662708 (VERIFIED), open a new tab and paste these links and press "ENTER".

 or you can also click in these link to download files Via Google Drive- # - https://drive.google.com/open?id=1YxJHihX3_jjKIto7Q9fPHLVGjKZWpJ9I
(VERIFIED).
(VERIFIED)

3. WinToFlash NOVICORP PROFESSIONAL Version files are in (WinToFlash.RAR) type FORMAT. DOWNLOAD IT.
4. If you have not WINRAR/Zip files extractor, then you can also download it using this link-
to download via Google Drive ( we recommended Google Drive)
https://drive.google.com/open?id=1ryW4QAEnuE8BLyrZ91Ie3gI3u95UJbK5 (VERIFIED)
5. After Completing DOWNLOAD ( WinToFlash.RAR) open it by using WINRAR.


6. EXTRACT all files in any location- Folder/Drive/ etc. for eg:- we extracts all files in " NOVICORP" folder in Desktop.
C:\Users\Amit PC\Desktop\NOVICORP.
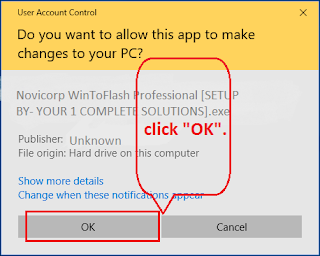

7. Open Folder and Run (WinToFlash.exe) SETUP.
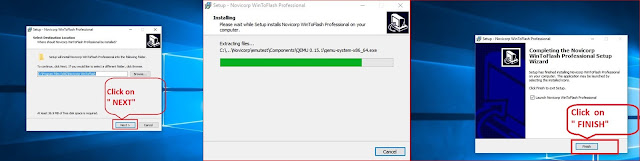

10. In Welcome Screen " you see introduction and various features of this software click " on NEXT" > check the box ' I accept EULA' > NEXT > PAID LICENSE > NEXT > SELECT YOUR LICENSE KEY PATH/DIRECTORY > SELECT 'Key.nkey' path to file {C:\Users\Amit PC\Desktop\NOVICORP\Key.nkey} > then finally NEXT.
11. Now USER you get 'WinToFlash NOVICORP PROFESSIONAL FULL VERSION SETUP FREE' .

Full WinToFlash features list
1
Create Multiboot USB
2
Auto download and cache
3
Wizard mode
4
Profiles support
5
Singleboot
6
Destroy all data on a USB / Wipe USB
7
Portable edition is available too
8
Read files from any source
9
Binary imaging
10
Test bootable USB
11
Partitioning
12
Formatting
13
Boot loader
14
Check disk
15
Total capacity limitation
16
CHS policy
17
Logging

Create Multiboot USB
-Any number of any Windows setups, up to latest Windows 10, can be placed on a single multiboot USB flash drive as well as any other linux, WinPE, small operating systems, LiveDVDs, offline antiviruses, recovery environments and even an Android!
-Over a 100 items are available.
Auto download and cache
-WinToFlash can download any ISO with antivirus, recovery tool, LiveDVD, partitioning software, linux, android, etc. for you automatically from a menu and cache it on a hard drive for future faster access.
If something is wrong, i.e. download URL is broken, server is offline and etc. WinToFlash offers you to visit download web site with a browser and select an ISO image later manually.
Wizard mode
-Simple Wizard is available for fast Windows Setup USB creation with only 2 options!
Profiles support
-You can save your multiboot or singleboot USB drive configuration into a file and load it back any time later to use again without setting everything up again.
-You can save your multiboot or singleboot USB drive configuration into a file and load it back any time later to use again without setting everything up again.
Singleboot
-If you can't boot with multiboot USB on a buggy PC, WinToFlash can create a simple singleboot bootable USB with only one item on it and provide you with bunch of compatibility options you can fine tune for better work with old and buggy BIOSes.
-If you can't boot with multiboot USB on a buggy PC, WinToFlash can create a simple singleboot bootable USB with only one item on it and provide you with bunch of compatibility options you can fine tune for better work with old and buggy BIOSes.
CHECK OUT VIDEO TUTORIAL.
Singleboot profiles provided:
-Windows XP Setup
-Windows Vista Setup
-Windows 7 Setup
-Windows 8 Setup
-Windows 8.1 Setup
-Windows 10 Setup
-Windows 2003 Server Setup
-Windows 2003 R2 Server Setup
-Windows 2008 Server Setup
-Windows 2008 R2 Server Setup
-Windows 2012 Server Setup
-Windows 2012 R2 Server Setup
-Windows 2016 Server Setup
-WinPE 1.0-10.x
-BartPE
-Hiren's BCD
-Windows XP/2003 Recovery Console
-Windows XP/2003 NTLDR bootloader
-MS-DOS
-AntiSMS
Destroy all data on a USB / Wipe USB
-Wipe a USB with 0s and destroy all data on it safely on a device, not file system, level Wipe all partitioning and formatting structures from a USB drive as well :--Quick or Full wipe can be done Portable edition is available too WinToFlash is available as Portable app as well as regular installable one.
Read files from any source
-You can select a physical CD/DVD drive as a source with WinToFlash as well as copy of files from a folder on your hard drive or network location.-If you have a disk image, you are not limited to ISO images for bootable USB items, you also can use ZIP, RAR, CAB, etc. too.
Binary imaging
-Create a byte-to-byte binary image of your USB drive in a file ,Restore or burn any binary image to a USB drive.
Test bootable USB

-WinToFlash includes Bootable USB Test application to test a bootable USB in 2 mouse clicks.
Partitioning
-WinToFlash supports following partitions type on a USB:--MBR USB-HDD
-MBR USB-HDD/256
-MBR USB-HDD+
-MBR USB-HDD+/256
-Superfloppy USB-ZIP/USB-FDD
Formatting
WinToFlash can format a USB into:--FAT16 CHS (MBR 0x06)
-FAT16 LBA (MBR 0x0E)
-FAT32 CHS (MBR 0x0B)
-FAT32 LBA (MBR 0x0C)
-NTFS
-exFAT
Boot loader
Chose desired bootloader for better compatibility:-
Standard Windows bootloader-GRUB4DOS.
-No bootloader at all to install one later with other app.
Check disk
-WinToFlash can check an integrity of your USB drive file system after all to make sure file system is not damaged.Total capacity limitation
-WinToFlash can make your USB drive any size you need, from 1 MB to it full actual size, for example, for old operating systems or buggy BIOSes.CHS policy
For better BIOS and OS compatibility you can use CHS as:--Standard CHS
-Write MAX CHS values to force BIOS using LBA calls.
-Write only 0s to turn this legacy addressing method off.
Logging
If something is wrong, detailed logging is always available.......................................................................................................................................
12. Now we hope that now you can use WinToFlash NOVICORP PROFESSIONAL FULL VERSION SETUP FREE and make bootable pendrive easily using[.ISO] files of any Operating System .ISO image file like:- [WINDOWS XP/VISTA/7/8/8.1/10. .ISO]
13. For more information:- you can see this Blog [VIDEO TUTORIAL]
Link:- https://youtu.be/9mWYsdIv2eI
13. For more information:- you can see this Blog [VIDEO TUTORIAL]
Link:- https://youtu.be/9mWYsdIv2eI
Comments