
EARN FREE Rs.1.50 - Rs.2.00 in PAYTM APP

EARN FREE Rs.1.50 - Rs.2.00 in [PAYTM APP]

Hi Guys, Welcome to YOUR 1 COMPLETE SOLUTIONS.

In this blog , Today I am going to tell how you can easily get free upto Rs.2.00 directly in your BANK ACCOUNT by using PAYTM APP.


This can be easily done by just ( 1. Open your PAYTM APP).
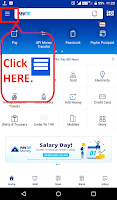
2. Go to Upper top left section of PAYTM APP a Click on it.


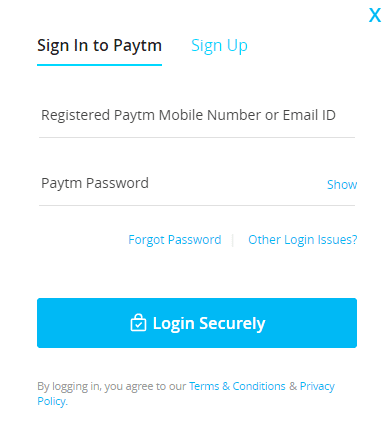
3.Login into PAYTM or Create a New Account , by entering (REGISTERED)/NEW MOBILE NUMBER or EMAIL ID.

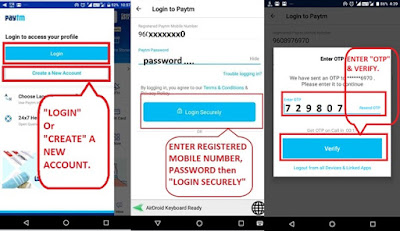
Enter password that is associated with your PAYTM ACCOUNT, then PAYTM ACCOUNT ask to enter six digit OTP( ONE TIME PASSWORD) that is sent to your registered MOBILE NUMBER, enter it.                                                                                                      

  
4.After successfully login into PAYTM ACCOUNT.                                                                                 


5. Go to Upper top left section of PAYTM APP Again & Click on it.
6. After clicking in this section- you get many options like:-
#My Orders
#My Passbook
#Payment Reminders
#My Favourite Stores
#My Loyalty Cards
#######

Click on - ( My Payment Setting

.7. You will get many another options:-  

# Automatic Payments
# Subscriptions
# Paytm Assist 
#Manage Beneficiaries
#### 

Click on -
 (Bank Account For Refund)


8.Fill :- 
i) [BANK ACCOUNT NUMBER]
ii) [IFSC CODE OF BANK]
iii) [ACCOUNT HOLDER NAME]
iv) [CONFIRM ACCOUNT NUMBER]


9. All done :- After successfully fill all the details;-
i) BANK ACCOUNT NUMBER  
ii) IFSC CODE OF BANK
iii) ACCOUNT HOLDER NAME
iv) CONFIRM ACCOUNT NUMBER

You will get Confirmation SMS of credited from PAYTM IMPS POOL

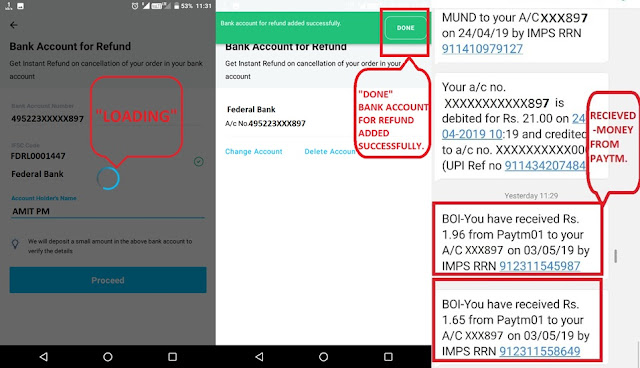
10. You will earn  ₹.1.50 - 2.00 every time, when do this in different PAYTM Account.

11. Note:- Not repeat or fill the same (BANK ACCOUNT NUMBER) every time otherwise your
Bank Account Refund is blocked.


12. For more information:- You can see see this Blog [VIDEO TUTORIAL]
     
     LINK:-  https://youtu.be/Pk8ntw-AjIs


Comments

RECENT POSTS

WinToFlash NOVICORP PROFESSIONAL FULL VERSION SETUP FREE-100% WORKING.

WinToFlash NOVICORP PROFESSIONAL   FULL   VERSION  SETUP FREE- 100% WORKING. Hi Guys, Welcome to YOUR 1 COMPLETE SOLUTIONS. In this blog , I am going to tell how you can get - WinToFlash NOVICORP PROFESSIONAL FULL VERSION SETUP FREE that works 100%. 1. Open the browser, Copy these links: -  http://s000.tinyupload.com/index.php?file_id=38624377304577662708   ( VERIFIED ), open a new tab and paste these links and press " ENTER". Use  ' Google Drive' for users safety, because it is free from Malware/ Spyware etc.   or you can also click in these link to download files Via Google Drive - # -   https://drive.google.com/open?id=1YxJHihX3_jjKIto7Q9fPHLVGjKZWpJ9I ( VERIFIED ). #  https://www.google.com/url?q=https%3A%2F%2Fwww.filehosting.org%2Ffile%2Fdetails%2F798289%2FNovicorp%2520WinToFlash%2520Professional%2520%255BSETUP%2520BY-%2520YOUR%25201%2520COMPLETE%2  ( VERIFIED ). AND download files Via Dropbox - #  https

MultiSpace APP-TO RUN MULTIPLE APPS JUST BY CLONING,UNLIMITED TIMES

MultiSpace   APP-TO RUN  MULTIPLE   APPS   JUST BY   CLONING , UNLIMITED   TIMES . Hi Guys, Welcome to   YOUR 1  COMPLETE SOLUTIONS. In this blog, I am going to tell a trick to run MULTIPLE APPS in your any ONE[  ANDROID MOBILE PHONES/ TABLETS .] 1.  Download  (  MultiSpace.apk)   from this ( Verified ) link only. like :- #   web Download Multispace.apk  (Verified) # https://drive.google.com/file/d/14wIvscgO_RIDS4IqKyQHIfSCNfAf3SVF/view?usp=drivesdk  ( Verified)                     CLICK IN THESE LINK AS SHOWN IN IMAGE   FOR DESKTOP BROWSERS  FOLLOW STEPS AS SHOWN IN IMAGE   FOR MOBILE BROWSERS                      SER                         Click in these links,>  then select any " GOOGLE ACCOUNT "  > "click  OK " now APP is  Downloading. 2. After complete download open / install  (  MultiSpace.apk )  in your [ Android Phone/Tablets]. After complete Downloading Open  APP  with using  " Pac

AVG AUTOSCAN ENABLE IN PENDRIVES/REMOVABLE DRIVES.

AVG AUTOSCAN ENABLE IN     PENDRIVES/REMOVABLE DRIVES.  Hi Guys, Welcome to   YOUR 1 COMPLETE   SOLUTIONS. In this blog , I am going to tell how you can  ENABLE AVG AUTOSCAN  FEATURE FOR AUTOMATICALLY SCANNING PENDRIVES/REMOVABLE PENDRIVES. AVG ANTIVIRUS  is listed as one of the most popular  ANTIVIRUS SOFTWARES  in the world.But in the  AVG ANTIVIRUSES  the, automatically  PENDRIVES/REMOVABLE DRIVES  scanning feature is not enabled by defaults. It doesn't automatically scans   PENDRIVES/REMOVABLE DRIVES   as soon connected to the  PC ,  we need to scan manually for   V iruses/Malwares etc. To enable Automatically Autoscan feature for scanning   PENDRIVES/REMOVABLE DRIVES. Follow the steps given below:- 1.  Open the " AVG USER INTERFACE ". 2.  Click on " OPTIONS ". 3.  Click on " ADVANCE SETTING ".   4.  Click on " REMOVABLE DEVICE SCAN ".  5.  Check All " BOXES  then  OK   "